Hakama
Introduction
The hakama are what shinigami wear on the bottom, from the waist down. It can kinda look like a skirt sometimes, but they are in fact pants, with two separate pant legs. You can make a version that is a skirt, called andon hakama, but we choose to make the kind with pant legs.
In my opinion, hakama are a pretty complicated garment to understand if you’ve never worn them or seen them up close and examined them before. Also, if you’ve never sewn a pair of pants before, the construction process can be confusing. I have made a sort of sarong-style pants in the past, but my friend had never sewn pants before. I had a little more confidence than she, but we still managed to make a few big errors in the construction.
Our Experience:
This recounting of our experience will only make sense if you’re using the same pattern-template we used (from Round Earth Publishing, which I don’t really recommend, but if you do use it, this info here might help you avoid the same mistakes we made, and help explain confusing parts of the pattern).
I’m not explaining step-by-step how to make a hakama here. It’s way complicated, and my explanation would be based on the pattern-template I bought, which would make my explanation a copyright infringement, so I can’t. I’m sorry. However, if Round Earth Publishing wants me to re-write their instructions in a method that can actually be understood, with diagrams that make sense, I’m all for it.
What we used for 2 hakama:
Sewing machine
Black thread
Hand-sewing needles
Scissors
Around 300 straight pins (total, not per hakama) and two pin cushions
Clothes iron
Three beach towels (not for cutting up; towels were unharmed)
Measuring tape
Wooden dowel (unharmed, yard stick would work, too)
One large plastic placemat (was cut up, will never function as a placemat again)
White vinegar (for permanent pressing the pleats) plus water
Chalk for marking cloth (test first to be sure it washes out)
About three to four yards of black fabric, per hakama
Duct tape (gaff tape would work, too, or some other thick, durable, sticky tape)
A pattern-template ordered from “Round Earth Publishing” (online company)
(a T-square was recommended, but we didn’t have one)
The Woes of the Pattern-Template
As I said, hakama are complicated for the newbie, and the pattern-template I ordered did not help much in making the process simple. I couldn’t find a pattern in the fabric stores I went to (I checked three) so I found one online at “Round Earth Publishing” and ordered it sight unseen.
Either my friend and I are idiots or the folks who wrote the pattern-template should find a different career. The pattern-template was very difficult for us to understand (and English is our first language, too).
For starters, there was no pattern, just a template, which I was willing to take a stab at, but which disconcerted my friend. We went ahead because I had a general idea what making pants was like, so I was more confident (maybe over-confident), and I can visualize things spatially pretty well (while my friend is better at formulaic operations and was the one driving the sewing machine) so it was sort of up to me to decipher the instructions, add that to my pants-making experience, visualize, and make it work.
Next—the worst part—the instructions were split up onto three different brochures, but not in a Part 1 Part 2 Part 3 fashion; it seemed at first as if there were three different versions which were written with different levels of detail focusing more intently on different parts of the process—it was a jumble. We were never sure which set of instructions we were supposed to be looking at, especially in the beginning.
There were “Overview” instructions, “Getting Started” instructions, and then what looked like more formal, detailed instructions for later steps in the process. Why couldn’t all the instructions be in one booklet, step by step, beginning to end, you know? It baffled us, but we managed to muddle through, flipping through the three sets until we found the set that gave us the info we needed for the next step. Poor design.
The Fabric
We bought basic black cotton-polyester fabric: nothing fancy, but now I wish we’d gotten heavier weight fabric.
We got everything cut out fine: definitely fewer pieces to cut out than for the kimono. And we cut generously. When measuring for fitting, we rounded up to higher numbers whenever there was a question. Extra fabric is easy to get rid of, but too little fabric is a big problem.
Marking the Pleats
Things were going fairly well as we traced the pleat lines. Here’s a trick. Use two people for this; it’s way easier with two people. We marked both edges of the fabric for the pleat lines (using the template strip as a guide), tugged the fabric tight, put a knee on it (we were working on the floor—we cleaned the floor first) and then each held one end of a dowel for a guide along which one of us (in this case me, since my arms are longer) ran the chalk to mark the lines. A yardstick would work, too, but a dowel is way cheaper (49 cents for the one I got at Lowe’s Hardware, you can also get them at Wal-mart, Michael’s, or some other kind of craft or hardware store).
Another note: this whole process was way easier with two people. I don’t know how a single person could do it alone.
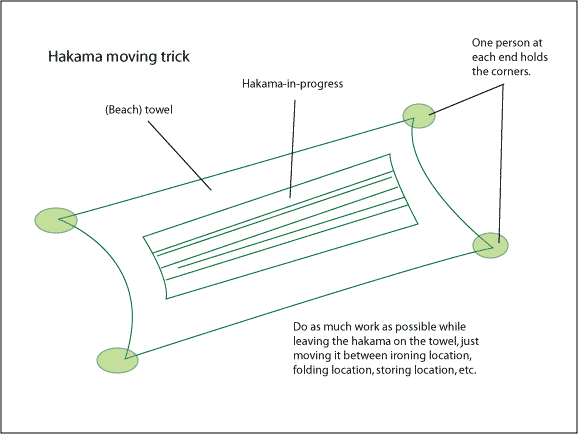
Pleats and Moving the Hakama
We could tell by the template and from looks we’d had at hakama in anime and real-life, that the pleats were going to be complicated and apt to get messed up. We sought a way to move the hakama without lifting them in a way that would muss the pleats. We used big bath towels as gurneys. A hakama laid on a bath towel could be moved around by two of us lifting the towel instead of grabbing the hakama. For much of the process that was how we moved the hakama—the bigger the towel, the better. However, if we’d sewn across the waist-edge of the pleats sooner after folding, we would have had less mussing, too, and towels might not have been as necessary.
Folding the Pleats
The dowel did double-duty as chalk marking guide and pleat straightener. By inserting the dowel into the future-crease of each pleat as we went, holding edges of the fabric with one hand and tugging the fabric tight using the dowel, we were able to get the folds nice and straight. Don’t forget to iron every fold, and then tack down with several pins along the length.
A Note About Pinning
I’m all for lots of pins to keep the pleats neat, but try to think ahead and make sure you don’t put any pins in a location that will be impossible to get them out of once the hakama is sewn. Remove pins or adjust pin locations as needed before every bit of sewing you do.
Avoiding Pleat Folding Mistakes
Then I made a stupid mistake and folded my friend’s pleats backwards (I was guiding the process). I was flustered a little and accidentally folded from the wrong side (hem edge instead of waist edge). It didn’t ruin the hakama but her pleats are backwards (the pleats are asymmetrical and the asymmetry is on the wrong side for her. We hope no one will notice.)
If you use the same pattern I did (what are you thinking? Did you read the “Woes of the Pattern-Template” section?) keep a sharp eye on the part of the pleats template with the arrows indicating the “waist edge.” Be sure it always points in the direction of the waist and the other edge is towards the hem. If you take it too literally, and lay the template down above the hakama with the arrows then pointing down towards the waist—that is upside down. If you lay the pattern above the hakama, instead of ON the hakama, the arrows must point away from the waist, up into empty space. The pleat template is like a super-mini-hakama; keep it matching the real hakama-in-progress in orientation.
Plus, you MUST keep track of which edge of the hakama is the waist edge. At this point, the two edges look identical except for where you drew out the crotch for future cutting (provided you’re using the same pattern-template we used). Once you open the two front panels to begin folding the pleats, you can’t tell anymore which end is up, so keep track. Once the asymmetrical pleats are folded the top and bottom are irreversible because the back and front are not the same.
The Pleats We Didn’t Sew
We should have sewn the pleats down as a soon as possible after pressing them. One stitch across the edge of the waistline side (as close to the edge as possible) would have done it, kept them neat, and saved us a lot of re-pinning headaches, but the instructions didn’t tell us to sew across there until several steps later, by which time our pleats had become ruffled and un-pinned and re-pinned several times. The instructions did say to hand stitch a temporary stitch across the whole front to keep the pleats neat—but I didn’t fancy hand stitching through several layers of fabric for about 3 feet of distance only to have to seam rip it out later. I’m just funny that way.
However, take note: you CANNOT stitch across the top of the pleats at the waistline until AFTER you cut out and sew the crotch, and you must stitch the for-looks-only-inseam (or omit it) BEFORE you sew the crotch (you can’t do it after the crotch is sewn). But then you can put a seam across the edge of the waistline to hold the pleats in place. Do NOT attempt to put a stitch further down the pleats, such as at the bottom (near the hem) of the hakama. That part has to be loose and able to open when you walk or otherwise move about.
Stitching the “Inseams” and Crotch
Stitching the crotch and inseams baffled us at first until we figured out what the instructions were saying. See the figure for my explanation. Take note, the “inseam” is for looks only, so that there appears to be a seam there. You do not technically have to sew the inseam.

The #%@# Side Seams
Then, we found the instructions woefully lacking in giving us a specific indication of when to finish the side seams. Since we couldn’t figure it out, we accidentally finished my friend’s side seams too soon, interfering with her ability to neatly fold her side vents. We realized what a dumb thing we did, and so waited until the very end to turn my hakama inside out and finish my side seams, which worked better. So only sew the side seams from the outside. Do NOT turn the hakama inside out to finish the seams neatly until the very end, once everything but the hem and final press is done.
Finishing the Front
We figured out the front of the hakama (the part that ends up over your belly) fairly easily. To get the bamboo leaf fold for the front vents: you just have to force it. Use lots of pins to keep it from shifting, and hand stitch tightly.
The Backboard
Still wondering what we used the duct tape for? We used a plastic placemat for the backboard, but when we cut it out, the edges seemed sharp (dangerous for the fabric over time) so we wrapped the edges with duct tape. We also needed to do this because we omitted the iron-on interfacing. Also to compensate for that, we made the backboard casing double thick—two layers of fabric per side, so cut out a total of four per hakama if you want to copy us on that.
Finishing the Back
We felt the instructions were ambiguous when it came to attaching the back-brace thingie. We lined up the rough edges like it said, and stitched, but then when we folded it up and into position, it was way floppy, so—since there was plenty of fabric on the bottom edge of the back-thingie—we cut it off and started over.
This time we made sure to put the back board itself (in our case, the placemat-plus-duct-tape creation) into the back-thingie, and mark with chalk right along its edge inside where we were supposed to sew. Then, we (removed the back board) sewed that line to the waist edge of the back of the hakama (about a quarter inch to half an inch down from the waist edge, but not too far). Then, we could put the back board back in, flip it up into position, sew it from the other side now, and it was anchored firmly along the top of the hakama.
Because we didn’t follow the ambiguous rules (we have an action plan for sewing: follow the pattern until it tells you to do something stupid; then do what makes sense) our back vents—which we had been smart enough not to sew immediately—no longer lined up with the edges of the trapezoidal back-thingie (FYI: “back-thingie” is not the technical term, but it’s how I remember it). We had to do some back vent refolding, and even then it still wasn’t very clean, so we had to do a little hand stitching to tuck in sticky-out-bits along the edges.
Note on the Back Tie
We did not sew it down into place because it was too difficult (okay, impossible). If you’d like to sew it down, I recommend you do so before you sew the two halves of the back-thingie together to make the pocket that will hold the backboard. Just sew it to one side of the un-sewn back-thingie, and then turn that side with the sewn on tie to the inside (keeping the dangling ends of the tie out of the way) when you sew the two sides together, because you’re sewing it inside out, and it will then be turned right side out. Yes, tricky, but not impossible.
We left the tie loose, and just inserted it through the two little hidden triangles when the whole thing was done. But because it was loose, we made very certain to tack down the top points of the triangles extremely well, since that tacking down bit is what will keep our hakama from falling off.
Back Tie Can Equal Obi
We sewed a separate obi (belt) for our costumes, but I realized later that the back tie of the hakama could be an obi all on its own. We haven’t actually tried it, but I theorize that if the back tie was made with white fabric instead of black, and a bit longer, maybe a bit wider, too, it could function as the main white obi that shinigami have tied around their waists, which would reduce the number of belts getting tied around your waist.
Final Fit Adjustments
The only fit adjustment we had to make was to get rid of poofie-ness in the back vent pockets. For both of us we made sure the back-thingie was sitting properly (nice and high: if you let it sag low, you get bigger poof pockets) and tucked the extra bit of back-vent-fabric down into the point where the vent opens (at the bottom of the vent, not at the waist). By careful adjustment we were able to minimize any creases this could have created by hand stitching cautiously, and in so doing, readjusting a little of the top of the side seam from the outside and stitching it down. We did not use the suggestions made by the pattern-template.
Hemming
The hemming of the bottom edge went fine, just be sure to try the hakama on first to check how big to make your hems. You don’t want to trip over the trailing edges of a too-long hakama.
Permanent Press
We did a final ironing of the pleats, using white vinegar mixed with water in a spray bottle, to permanent press the creases in.
Day of Performance
Wearing the hakama went fine. Of course the pleats got a little messy, but after a point you just have to ignore it. I must say, hakama are pretty comfortable, too. When I got home, I was able to take off the hakama and straighten the pleats, pin them in place again, and hang the hakama in my closet, ready for the next adventure.