Introduction
I chose to call them headpieces instead of hairpieces because I thought the latter implied Byakuya was going bald.
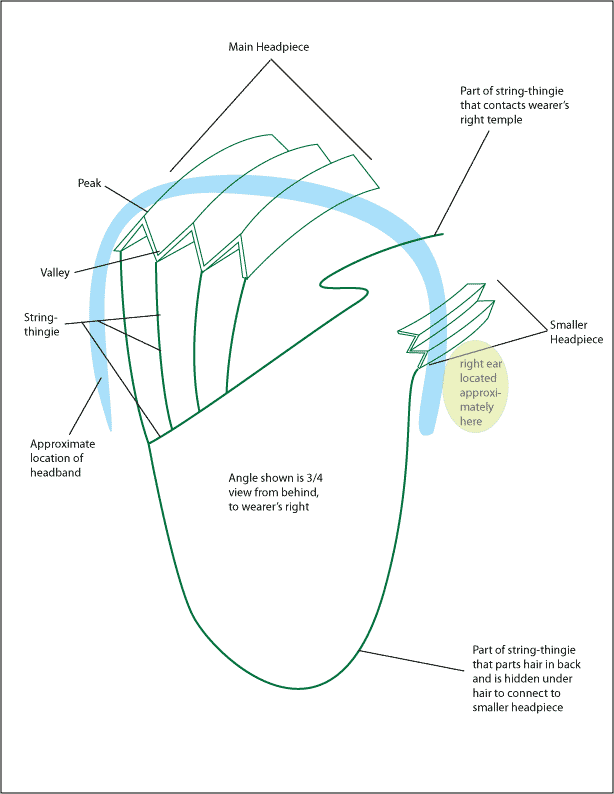
Byakuya wears what appear to be porcelain hair ornaments, one on top of his head and slightly to the left, and one above his right ear. And then there are some sort of decorative threads or twine that descend down the back from the top one.
Also, I have a full head of hair, but not enough to match Byakuya, and I didn’t really feel up to doing things with it like brushing it forward and out the front of the headpieces and such, so I planned to buy some synthetic hair to augment my own.
The headpieces were, hands down, the most difficult and frustrating part for me—worse than the kimonos or hakama. Many steps went into their creation, and they still have faults, which I hope I can ultimately fix.
Materials
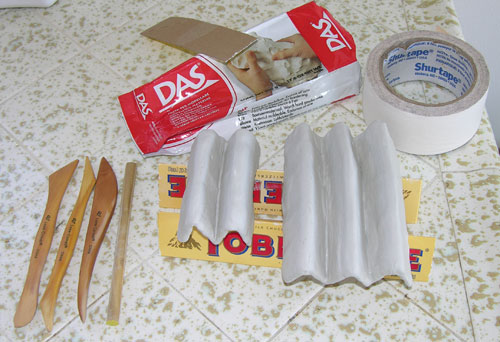
White, air-hardening clay
Cardboard (single thickness, non-corrugated)
Hold-tu plastic adhesive
Gaff Tape (white)
Hot Glue
Monofilament line (ultimately, not used)
Hair clips (ultimately, not used)
Synthetic, black hair
Hot steam
Clay sculpting tools, including a small section of 3/8 inch dowel
X-acto knife and scissors (be careful!)
Water
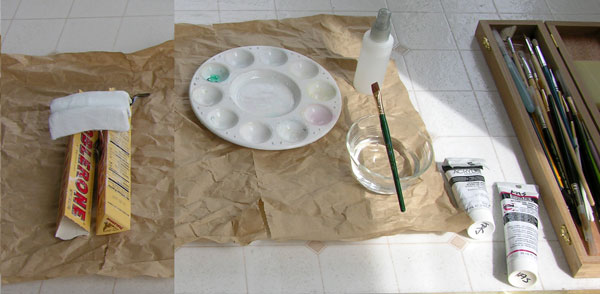
Acrylic paint (white and phthylo-green)
Gloss Gel Medium (paint additive, creates shine and glazes, also is an adhesive)
Paint brushes and palette
Small black elastic hair ties
Black head band
White and light green rayon embroidery thread
Narrow gauge copper wire and wire clippers
One safety pin
Creation (10 Steps)
Step 1: the cardboard core
I started out with the idea of creating both headpieces directly from white clay. However, after about five minutes it became obvious that I couldn’t get the clay to a suitable consistency to allow me to easily shape it and have it retain its shape as it dried.
So on to plan B. I came up with the idea of making a cardboard base and then adding a layer of clay to it. The plan worked well. I cut a shape of cardboard and fitted it to my head, and then cut five more of the same shape. The next challenge though, was making them into one piece by attaching them along the “peak and valley” edges with gaff tape. Ultimately, I just forced them together, and when done, I had a rough cardboard version of the main headpiece. I went through the same process for the smaller headpiece.
Step 2: adding the clay
Now that I had a framework, I rolled out thin layers of clay (about 0.25” thick) laid them on each cardboard panel, and trimmed them to fit. Using a little water I fused them in the valleys and on the peaks and wrapped the clay around the rough edges at the front and back. Then I had to let the whole thing dry completely, which took about five days. (Drying time varies depending on ambient temperature and humidity). For a drying rack I used two of the triangular cardboard candy wrappers used for Toblerone chocolate; they came in very handy, and were fun to empty.
Step 3: painting
Once dry, the clay was a sort of pale grey, not quite white. And at any rate, I consider the headpieces to be a very light white-green. I repainted the outside with acrylic paint. I mixed Titanium White, Phthalo-green blue shade, and Gloss Gel Medium (for shine) to get the pale green I wanted. I also painted the underside white., particularly since some of the colorful cardboard could still be seen
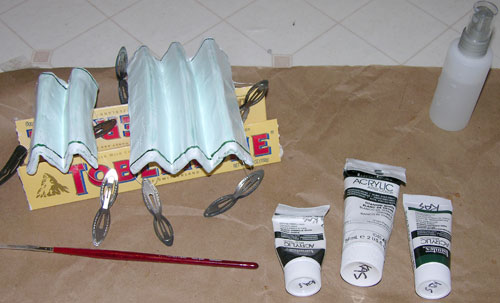
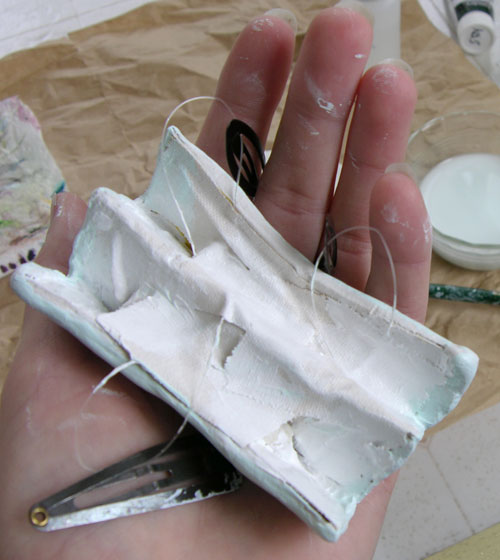
Step 4: structural integrity and adding the clips (which would later be removed)
I was worried about my creation flexing and cracking. To reinforce the peaks I packed them with some plastic adhesive called “Hold-Tu” (which is just one brand; it exists as other names, too) but making sure to leave some space for where I’d be laying in the fake hair. I taped the adhesive down with gaff tape.
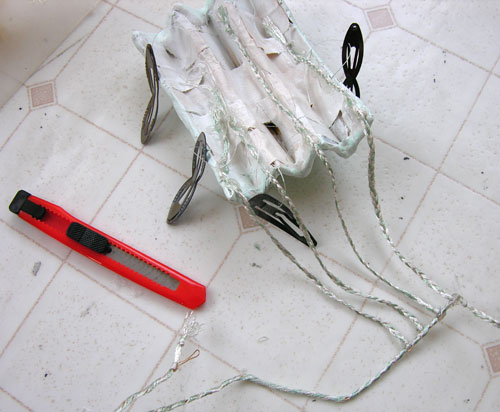
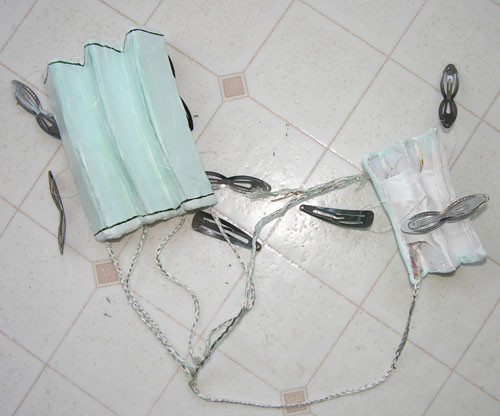
My original idea was to hold the headpieces on with hair clips. Ultimately, I learned that the hairclips were not sufficient to secure them, and a new tactic was required. However, in the moment, I made a loop of monofilament line (“fishing line”) through the clip and used gaff tape to secure the other end of the loop to the headpieces.
Step 5: creating and adding the threads
I don’t know exactly what to call them. If you look at the back of Byakuya’s head you’ll see some kind of light green string or thread descending in four places from his main headpiece and joining up with another that comes from his temple, and then descends down the back of his head, parting his hair. How does the string-thingie stay on? Where does that trailing end go? Beats me. I attached the threads to the main headpiece and looped the trailing end up and attached it to the back bottom corner of the secondary headpiece. The part that sticks to the temple was hard. I tried to pin it in place, with mixed results.
The string-thingies themselves I made from rayon (type of synthetic material, not a brand) embroidery thread. Rayon is kinda shiny, which I liked. I got white-silver and pale green colors and braided them (two white to one green). I used a safety pin to secure one end while I braided, pinned to the knee of my jeans. For part of the string-thingie contraption I made a core of narrow gauge copper wire, so it would keep its shape, and braided around the wire, covering it fairly well.
The whole thing I then attached to the headpieces with hot glue.
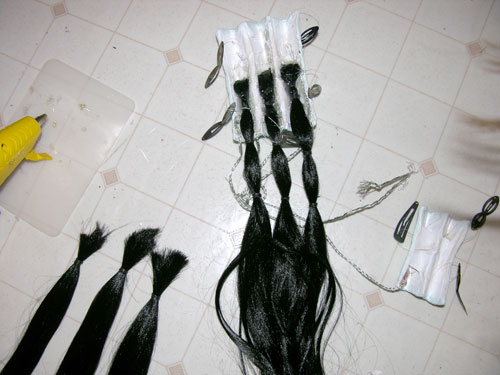
Step 6: preparing the hair
The hair did not come out of the bag nice and straight; it was wavy. I straightened it by spontaneously being struck with the idea of steaming it straight while my rice was cooking. I managed to burn my fingers a lot (steam is hotter than boiling water) but by holding the hair tight and passing it slowly through the hot steam I got the hair to straighten out. I then brushed it well, once it had dried from its steam-immersion.
Step 7: adding the hair
I had only a certain amount of hair available, and ten places where it was needed. At first, I worried I hadn’t bought enough, but it turned out to be just right. Hair needed to fill the triangle gaps on both the front and back of the main headpiece as well as the back of the smaller headpiece, and trail away in correct amounts. For the front of the smaller headpiece, I had to somehow fill those gaps, too. In the anime it’s just Byakuya’s hair growing out from his scalp—he must have really thick hair, mine is finer.
Using tight rubber bands I isolated sections of hair I wanted so it wouldn’t scatter, cut it, and then glued it in place. The hot glue did melt the hair if I didn’t let it air-cool for a second, so I developed the trick of letting the glue drip down from a height, so it would not be too hot when it hit, but still liquid enough to bond.
Step 8: fitting and fixing
The fitting went poorly. Several things went wrong. Mainly, the clips did not hold the headpieces at all securely. We’ve forgotten whom, but one us (either me or my friend) came up with the idea of affixing the headpieces to a black headband. A quick trip to the store brought us said headband, and it worked much better than the clips (I attached the headpieces to the headband with hot glue), though not perfectly as there was still risk of it falling off, and the headband was visible over my hair. I managed to move some hair over it in places, which helped but didn’t completely solve the problem.
Also, I had thought—back when I cut the cardboard in step 1—that I had fitted the main headpiece perfectly to my head, but looking in the mirror revealed that it did not fit smoothly, and part of the back end did not contact my head. It was a bummer, but there was nothing to be done.
Step 9: wearing
I had hair in my face all the time. Naturally, Byakuya does, but his hair magically parts to allow him to see from both eyes. I had gelled the hair to attempt that, but the weather ignored the gel, and pretty soon half my face was just covered with hair. My friend helped me pin some back, which gave me some relief, but the pin came out eventually.
The headband with attached headpieces shifted forward and back, which was annoying, and I was always fixing it. I couldn’t bend my head forward or it would start to flop off. Vigorous movements were also out because of the risk of dislodgement. Additionally, the headband was quite tight at the ends, behind my ears, which started to hurt after a while, and then subsided into a dull ache.
Step 10: future plans to modify
I may have to completely recreate the headpieces and use a wig, into which I could sew the headpieces securely. I didn’t want to use a wig, but the alternative is dying my hair every time I want to wear the costume. I like black hair, but it is a hassle and expense. If I do recreate the headpieces, I might do so with only cardboard, not clay. Even though I like the look of the clay, cardboard might do just as well, and would be lighter.
For the moment, though, I’m doing some work to keep the hair out of my face. I didn’t want to use glue, initially, but it’s the medium of choice to make fake hair do what I want. I diluted my Gloss Gel Medium (which works as an adhesive) with water, and combed it through the hair in front, shaped it with my hands, trimmed as needed, and used props to make sure the hair dried in the positions I desire. I only did this to the hair in front. All the hair in back I left loose to blend with my own hair.
If I decide to keep the headband situation, I might add some more fake hair to the headband itself, to disguise it. I also might investigate additional ways to secure the headband in place, and try to do something to fill in the gap between the back of the main headpiece and the top of my head. Maybe adding more hair to the headband would allow me to fill in that space. I will also hot glue in place onto the headband the part of the string-thingie that comes forward to contact at the temple.