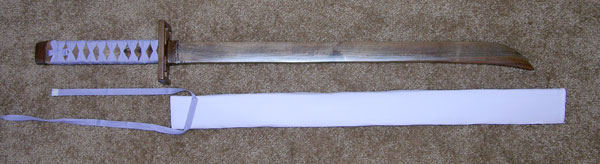
Scabbard
Introduction:
If I wanted to carry my “my-dad-is-so-wonderful-he-made-me-a” sword I knew I had to have a scabbard, or sheath, for it. I don’t know the Japanese word for their sword scabbards (note to self, look it up), so I’ll just call it a scabbard. I also knew I’d need a way to hold the scabbard on. In the anime, the shimigami just stick it though their obi, but visions of pausing to pick the scabbard up several dozen times when it slipped out convinced me I’d better have a backup.
As for what I was aiming for, it wasn’t the easiest thing in the world to get a look at Byakuya’s scabbard because he wears a haori all the time, which conceals it, but persistence pays off. Turns out it’s a light purple, and I knew it would need to be a little longer and larger than the sword. The real thing might be made of metal or something (yes, yes, I know it’s really just painted onto an animation cel) but the best stuff I had and could work with was cardboard, hot glue, tape, and paint.
Ingredients:
--A sheet of cardboard (single layer, not corrugated) in my case about 10 inches by 40 inches in size
--Gaff tape (gaff tape is a cloth tape, I don’t recommend duct tape because it’s plasticy so paint won’t stick to it as well)
--hot glue gun, with glue
--paint of suitable color (in this case, I mixed white and purple craft-quality acrylic)
--some kind of cord or tie to hold it around my waist, I used left over “ito” (single fold bias tape, lavender color) from when I wrapped my sword hilt, around 30 inches
--sharp craft knife, like an X-acto blade—be careful!
--water (with a bowl to put it in)
--a surface to work on that can get plenty wet, and some kind of towels or sponge to clean up all the water after
Procedure:
Water Plus Cardboard
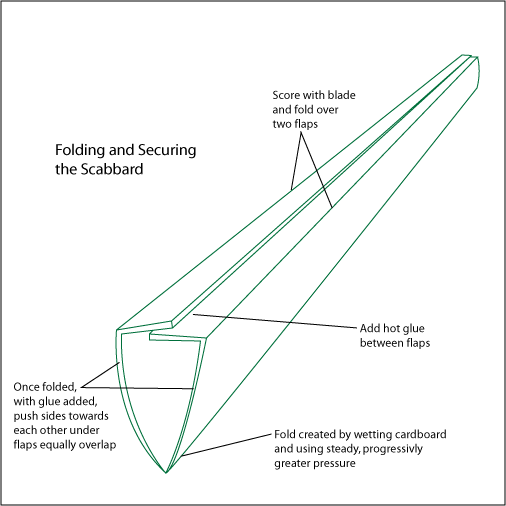
Wonders can be accomplished with cardboard and water. When gotten wet, cardboard can be bent and folded without erratic creases. Then, if secured in position while it dries, once dry it will keep its new shape peaceably (cellulose is wonderful stuff). I needed to fold my cardboard in half, but I wanted a rounded shape to the fold, not a sharp crease, and slightly curved sides to the scabbard.
I put the cardboard flat (with the side that did not have the pasted on paper image up, so I was looking at the bare brown side, not the side proclaiming what the box formerly contained) and dribbled on some water, and some more water, and more. Slowly, as the water was absorbed, I started curving the cardboard, pushing it farther and farther into a longitudinal fold (with the brown side out and the colorful side in).
It took time, and I kept adding more water without forcing the cardboard too much or letting the cardboard turn into mush. I used a paper towel to soak up the water and dribble it on. I managed to avoid ripping and creasing until the last little bit, but I was asking for a pretty extreme fold, so I think I did pretty well. That fold took care of one edge of the scabbard, the edge against which the cutting edge of the sword would rest.
The other side included now the two raw edges of cardboard. I wanted to fold these edges over about 90 degrees each and overlap them to form the edge of the scabbard against which the blocking edge of the sword would rest when sheathed. I scored the wet cardboard with an X-acto knife and folded it over cleanly. When scoring I was careful to go through just the outer layer of cardboard-paper. I overlapped the two edges next, forming clean creases, and trimmed off any extra cardboard the stuck out.
Before finishing, I put my sword into the sheath, even though it was wet, to be sure it would fit. It was snug, which I thought was good, less chance of the sword falling out. Then I removed the sword and wrapped the wet cardboard in rubber bands to keep it in position, and put it on a windowsill to dry.
A Note About Cardboard
Cardboard can be heavy on chemicals and glue. The paper towel I used for dabbing on the water was noticeably yellow afterwards from glue and chemicals getting on it from the wet cardboard. I’m pretty sure cardboard is relatively harmless (but don’t quote me on that, I’m not citing any kind of evidence or studies) but you might want to be sure not to drink the remaining water or eat the cardboard. Okay?
Check Length
Once dry, I put the sword in again and trimmed off any extra, so the sheath was as close to the length of the sword as possible.
Finishing Basic Construction
I hot glued the two flaps down and again checked for any sticky-out bits to trim off. I then covered both edges with a layer of white gaff tape, just to be sure everything would stay together. Although I, of course, painted the tape, the edges of the tape are still visible on the finished scabbard. I hope folks will think it’s a decorative element.
End Cap
The scabbard still had a hold at both ends, like a tube. I cut a little piece of cardboard exactly the shape of the hold and hot glued it down, trimmed it so it blended in, without any sticky-out bits, and then covered it with some tape.
Painting
Once everything was good and dry and looked neat, I painted it with two layers of light purple paint I mixed myself from dark purple and white. I think I also mixed in some Gloss Medium Gel to make it a bit shinier.
Waist Securement
My remaining scraps of bias tape worked for a sort of belt to keep the scabbard from falling off-and it was a good thing I had it, as sticking it through my obi was not secure enough once the sword was drawn.