My sword: wrapping the ito
Materials:
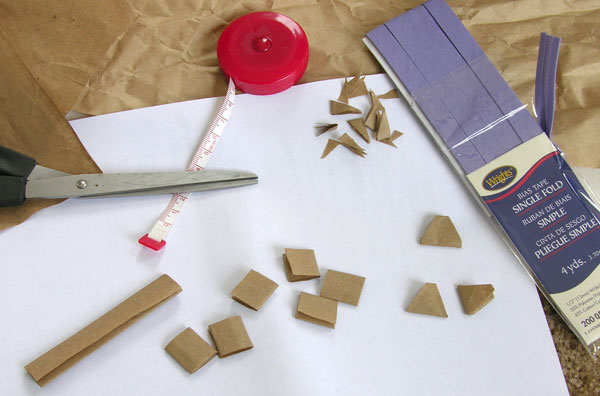
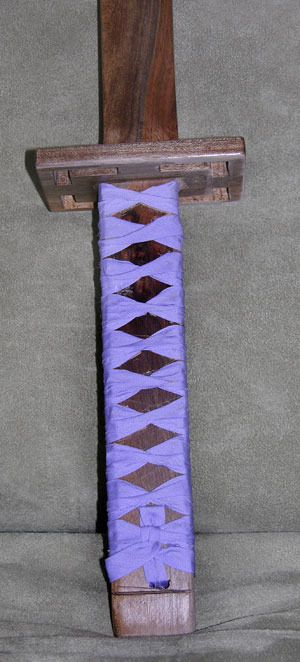
Ito (I used lavender 13mm bias tape, it took about 3.5 yards, one package)
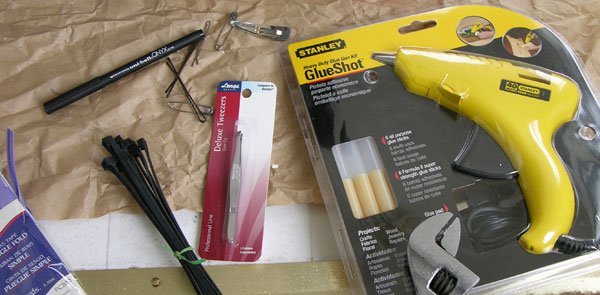
Hot glue
Newsprint
Metal tweezers
Tiny metal crochet hook
Metal hair clip
Acrylic paint: silver, burnt umber, burnt sepia, phthylo-green
Gloss Gel Medium (an additive for acrylic paint, makes things shiny, is also an adhesive)
Water and paper towels
One father that does awesome wood-working
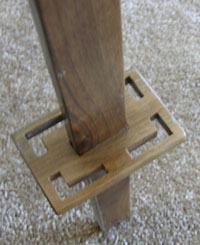
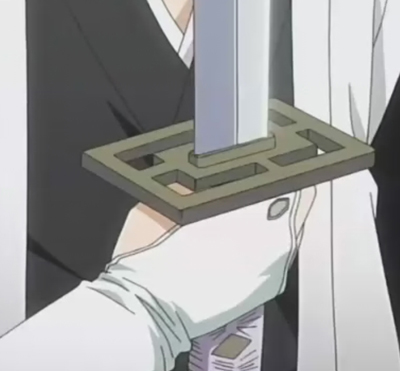
I totally lucked out on the sword. I have a wonderful wood-working talented father who made my sword for me. I drew schematics of Senbonzakura and sized it to my body size, and then emailed him the art and directions. A few weeks later, he had a sword for me–and I love it! It looks just like a wooden version of Senbonzakura. (yes, it’s wood, not metal, but it is still really beautiful, and one-of-a-kind)

If making your own sword (and it’s of a traditional size, not like Ichigo’s Zangetsu, or Renji’s released Zabimaru), to size it, stand straight with your hands hanging at your sides. Have someone else measure from your fisted hand to the floor. Subtract around an inch from that, and that measurement is how long the blade of your sword should be–maximum. The length of the handle should be around two and half fists. Fist both hands and stack them as if holding the handle (as in, right pinky to left thumb), measure, and add the length of another half-fist. Then add another inch for the pommel cap (fuchi or kashira in Japanese).
I chose not to go buy a “real” sword. If you don’t know, know now that there are two kinds of “real” swords out there: the fake dress-swords that just look pretty, and the real thing with a cutting edge (often called “live steel”). The real thing is made by a swordsmith and is very expensive, and is restricted by law in some places, and often cannot be carried at conventions or in public. The dress-swords come in a variety of qualities–as cheap as $10 or $20–but I did not want a dress-sword ultimately because it would not have the right color ito wrapping or handguard.
You can buy dress swords claiming to be Kuchiki’s sword or Hitsugaya’s sword or whatever, but I got a look at a couple at the sak-fest and did not approve of the hilt-wrapping, and the swords somehow looked like fakes. Even though they had metal blades and all and were supposedly accurate to the manga/anime, I wouldn’t trade my wooden Senbonzakura for one. Maybe that’s just affection on my part for my sword: in working on my sword I feel like I bonded with it a bit. It is special and unique and partly crafted by me, and to my specifications, and it’s fitted to my body size. Other folks can keep the ones they’ve bought; I’ll keep the one I put personal time and effort into.
“Ito” is a Japanese word that most literally means “thread” but in the case of tsukamaki (literally “handle wrapping”) ito is a long cloth braid which can vary in width, quality, and color and is used to wrap the tsuka, or handle, of a “samurai sword.” I don’t have time to go into all the details, but there are several types of Japanese sword, each with their own name, but which most Westerners call simply “samurai swords.” I’ll call them simply: swords.
For instructions on how to wrap ito (once I did a little research and knew that ito had to be wrapped around my tsuka) I discovered a great site by Mr. Thomas Buck. I suggest you go there to read the instructions in full. Here, I will merely recount my experience in wrapping my tsuka.
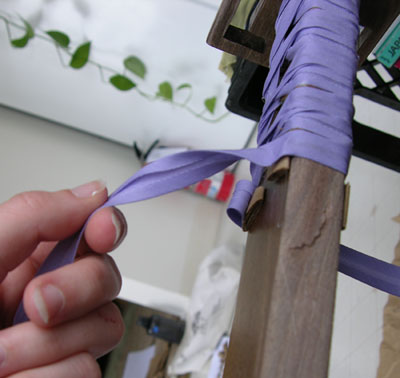
I did not follow Mr. Buck’s instructions to the letter. I improvised. After all, my situation was different than the usual (for example, I did not have a real sword) and I was going for looks only. I left out the “same” (skin of a ray or shark) and did not do all the measuring, paper applying to the edges of the tsuka, and I did not use rice glue. I used hot glue, because I’m nontraditional and too practical for my own good. I do recommend hot glue for anyone trying to fake an ito wrap; it worked great for me, though I did burn my fingers a bit. Kids, have an adult help you.
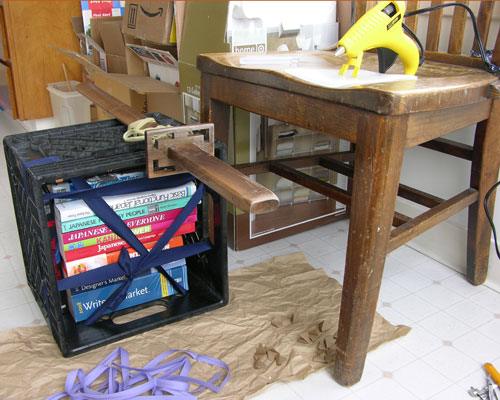
The first obstacle I encountered was a tsuka stand. The stand is to hold the tsuka in place, but must allow you to flip the tsuka from time to time. I improvised. I took a plastic milk crate, filled it with heavy books (for stability) and used some cloth ribbon I had lying around to lash the sword to the top of the crate. Every time I needed to flip sides, I loosened the ribbon, rolled the sword, and re-tightened the ribbon. Later, when I wrapped Zabimaru’s hilt for my friend going as Renji, she held the sword steady for me as I wrapped.
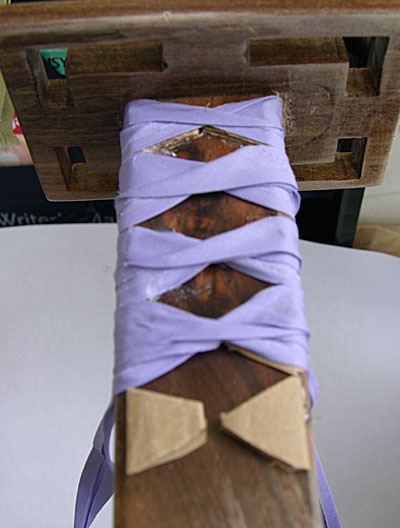
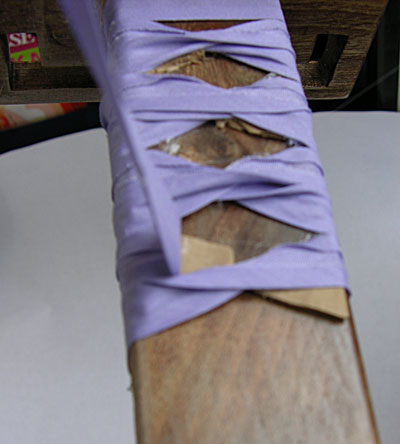
But before I went to work I needed the paper wedges. I used a sheet of plain newsprint (formerly used as packing material) and folded it a bunch of times (around a dozen or so...). Then I cut off the extra and cut the folded strip into triangles. Here’s a tip, don’t cut a perfect triangle. Make it like a skinny trapezoid, because if you cut perfect points the folded paper inside will fall out. Try it, you’ll see what I mean. I, initially, cut my wedges way too big. I had to go back and cut smaller ones because my ito wasn’t covering them completely.
Oh, a note about my ito. I went to a fabric store and bought 13mm lavender (Byakuya’s tsuka is wrapped with lavender ito) bias tape. Despite the name, it isn’t tape like sticky tape, it’s just plain fabric: no glue involved. It’s just cotton and polyester. The only problem with it was that the back side of the bias tape is not pretty like the front. The edges of the fabric tuck around and are visible on the back. Since the ito is folded over and both sides exposed, it can make it look messy. I was worried when I noticed this, but I went ahead anyway, and I was still fairly happy with the results.
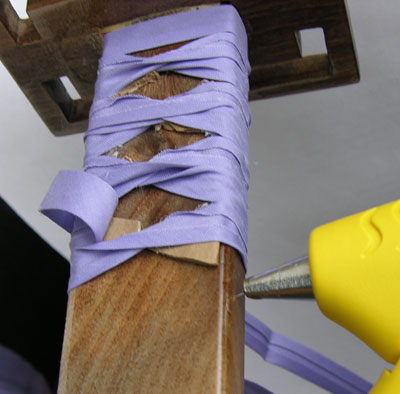
For the wrapping, I started on the ura side, as traditional, and followed Mr. Buck’s instructions. I glued the two paper wedges down first. I folded over one side of the ito, glued it to the side of the tsuka, then folded over the other, glued it down, and flipped the sword to do it again on the other side. I crossed the ito twelve times per side (number of crosses will vary depending on the length of your hilt). I messed up once, but every other time I was sure to check the previous crossing to see which length of ito was on top last time, and cross them in opposite order for the next time. I was very certain to pull tightly on the ito and wait for the hot glue to dry and bond every single time. It’s very important for the ito to be wrapped tightly.
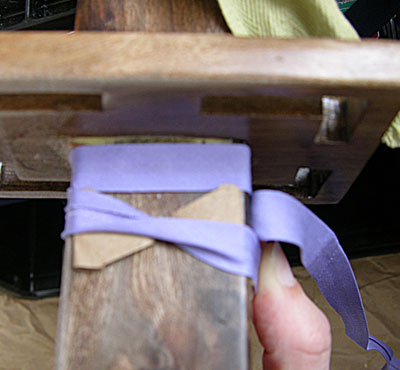
I spent three hours bonding with my sword (ha, “bonding” like glue...sorry, bad pun). I had asked my father to put a hole in the tsuka near the pommel cap (in Japanese, that hole is called the “mekugi ana”). The hole is essential if you are going to tie the ura and omote knots in the traditional fashion. I had little trouble tying the knots, and I secured them with hot glue.
When I’d finished, I was ecstatic. I thought it looked great. I did have touch up to do. In some places my paper wedges were too big, and could be seen, so I used an exacto-knife (kids, ask an adult to help) to cut away the extra, along with any extra glue.
Very useful during the process was a pair of tweezers to adjust the ito and yank away dried or semi-dried glue, a tiny crochet hook I used to prod ito (especially when tying the knots) and poke glue into little pockets, and a metal hair clip which had a flat flange I could use to scoop up extra glue before it dried. I thought I might need to clamp the ito in place at times, but since I was gluing it down at every step, I never needed to.
It was actually a lot of fun. I wish I had a few more swords to wrap...
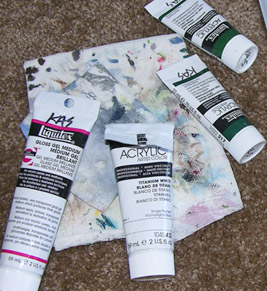
I later added a ridge around the base of the pommel cap. My pommel cap was not really a cap at all. It was contiguous with the wooden hilt, but I wanted to fake it. I carefully placed a thick line of hot glue all around the edge. To help it blend in I glazed it (along with the rest of the pommel cap) with brown paint created by mixing burnt umber, burnt sepia and phthylo-green acrylic paint. I used this same color to glaze the hand guard.
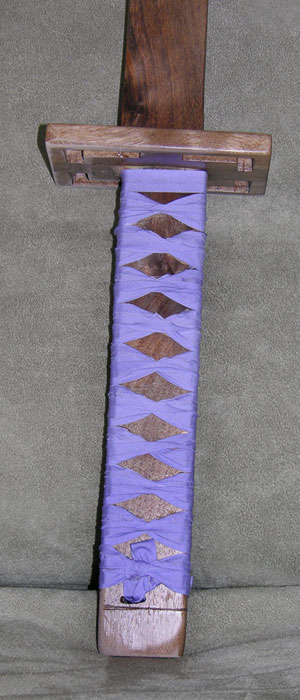
Below, the finished hilts (uma side on the left, omote on the right) but before I added the fake pommel cap ridge, as mentioned above.
I like the wood grain of my sword, but I wanted the blade to flash in the sun, so I mixed some iridescent silver paint with water and gloss gel medium to make a sort of colored glaze/stain. This I rubbed onto the blade with a paper towel. I didn’t use a brush, which would have left brushstrokes. It was an exercise in patience because I had to let it dry without touching it, and with so much water involved it took a long time to dry. The gel medium goes on white, but dries clear, so it was an exercise of faith to believe that the sword would be pretty and not remain milky-silver-white. It did dry clear, just adding a slight silver shine and flash to the blade.
The day of, wielding the sword, posing with it, and play-fighting was lots of fun. I’ve since hung my sword on my wall, and am very proud of it.